
The Sprite Forum
Fulcrum pin removal from wishbone ??
Posted by dmq400


 |
Topic Creator (OP)
Aug 21, 2023 10:21 AM
Top Contributor
Joined 4 years ago
357 Posts
|
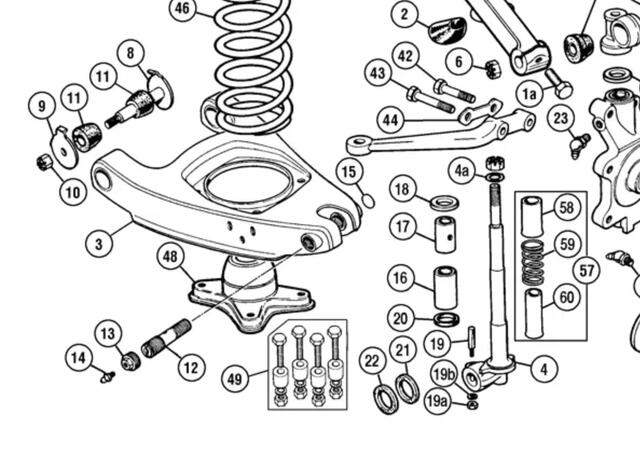
Stumped on this one. The Moss pic shows this pin (#12) which appears to be threaded on both sides. I'm still working on getting the center pin removed from the swivel piin...and when I do...what then?
Plug on both sides and grease nipple easily off but don;t know the rest. Thanks -Dan-
Plug on both sides and grease nipple easily off but don;t know the rest. Thanks -Dan-
|
Aug 21, 2023 10:43 AM
Top Contributor
Joined 14 years ago
4,822 Posts
|
|
Hi Dan,
The fulcrum pin is threaded on both ends and those threads are the bearing surface that allows up and down movement of the kingpin and axle assembly. Getting that pin out can be a real chore. First you have to remove parts 19, 19a, and 19b. Loosen the nut until it is flush with the end of the threads. Then hit it gently on the nut and drive it up and out. When 19 is out you should be able to unscrew pin 12 from the kingpin. If you are unlucky everything is rusted together and you'll have to saw through the fulcrum pin on both sides of the kingpin. Then you can unscrew the pieces of the fulcrum pin from the A-arm.
Rick
In reply to # 279995 by dmq400
Stumped on this one. The Moss pic shows this pin (#12) which appears to be threaded on both sides. I'm still working on getting the center pin removed from the swivel piin...and when I do...what then?
Plug on both sides and grease nipple easily off but don;t know the rest. Thanks -Dan-
Plug on both sides and grease nipple easily off but don;t know the rest. Thanks -Dan-
Attachments:
IMG_6968.jpeg 51.7 KB

1974914
Doug K
|
Aug 21, 2023 11:48 AM
Top Contributor
Joined 3 years ago
296 Posts
|
Or hit it REALLY HARD! Whatever it takes. On one side of my car, that wedge pin just would not budge without a sharp blow from a BFH.
In reply to # 279998 by refisk
Loosen the nut until it is flush with the end of the threads. Then hit it gently on the nut and drive it up and out.
In reply to # 279995 by dmq400
Stumped on this one. The Moss pic shows this pin (#12) which appears to be threaded on both sides. I'm still working on getting the center pin removed from the swivel piin...and when I do...what then?
Plug on both sides and grease nipple easily off but don;t know the rest. Thanks -Dan-
Plug on both sides and grease nipple easily off but don;t know the rest. Thanks -Dan-
|
|
Topic Creator (OP)
Aug 21, 2023 12:19 PM
Top Contributor
Joined 4 years ago
357 Posts
|
Rick - UNSCREW pin 12? Looking VERY closely at Moss now....do I have that right that one side is a much smaller diameter thread OD that goes thru the wishbone with the larger OD thread then following and locking it in place? So there is an internal slot on the larger end to "unscrew from" ? I guess if I had a new pin here it would make more sense.... Thanks for the help -Dan-
|
1974914
Doug K
|
Aug 21, 2023 12:50 PM
Top Contributor
Joined 3 years ago
296 Posts
|
Hey Dan,
Yes, Pin # 12 has a slot in the end (on the big OD side, under the grease plug). Get a big flat-blade screwdriver and get to work. I used a screwdriver with a square-section shank so I could put an adjustable wrench on it for leverage.
Sometimes they're stuck pretty good. Use penetrating oil and/or heat to get those buggers out.
 Madison Wisconsin, USA
Sign in to contact
1931 Morris Minor Saloon "Cammy OHC"
1960 Land Rover Series II 1962 MG Midget MkI 1963 Volkswagen Karmann Ghia & more |
Aug 21, 2023 12:52 PM
Top Contributor
Joined 20 years ago
161 Posts
|
Before you through all that....... Can you wobble the kingpin fore and aft? If so, the pin 12 and/or the threaded bushings are worn. You're best to replace a-frame and pin. Does the spindle have movement on the kingpin? You're going to replace the kingpin and rebush the spindle. If so, bin the a-frame and king pin assembly.
Peter C
Peter C
Member Services:
Supplying New Old Stock parts for all imports. A LARGE quantity being loaded to our EBAY store stores.ebay.com/worldwideimportautoparts
Rebuilding lever shock absorbers for British cars.
(608) 223-9400 M-F 9-5 Central or parts@nosimport.com
Steve-in-Florida and Parthuman thanked PeterC for this post
|
|
Topic Creator (OP)
Aug 22, 2023 06:04 AM
Top Contributor
Joined 4 years ago
357 Posts
|
|
Mtn Sprite
Layne M
|
Aug 22, 2023 09:40 AM
Top Contributor
Joined 7 years ago
1,398 Posts
|

Stoffregen Motorsports
Matt Stoffregen
Cool, CA, USA
Sign in to contact
1957 Land Rover Series I "I've Called It A Few Names"
1962 Austin-Healey Sprite 1965 Austin-Healey Sprite |
Aug 22, 2023 12:07 PM
Top Contributor
Joined 5 years ago
1,914 Posts
|
In reply to # 280008 by PeterC
Before you through all that....... Can you wobble the kingpin fore and aft? If so, the pin 12 and/or the threaded bushings are worn. You're best to replace a-frame and pin. Does the spindle have movement on the kingpin? You're going to replace the kingpin and rebush the spindle. If so, bin the a-frame and king pin assembly.
Peter C
Peter C
I'd go one step further and replace the kingpin too. If time is valuable to you, order a new pair of kingpins from Mini Mania (with HD spindles welded in) and some new control arms and call it done.
New business website coming soon
Instagram - @mstoffregen
Steve-in-Florida thanked Stoffregen Motorsports for this post
|
|
Aug 22, 2023 04:41 PM
Top Contributor
Joined 9 years ago
367 Posts
|
I covered dismantling the front suspension in episode 22 of my Bugeye Build... ?si=w2YAUMYovVEU4kdX
Kingpin removal starts at about nine minutes in.
Hope that helps,
Ian Cassley
59 Bugeye Sprite
Calgary AB Canada
www.youtube.com/econoboxgarage
Kingpin removal starts at about nine minutes in.
Hope that helps,
Ian Cassley
59 Bugeye Sprite
Calgary AB Canada
www.youtube.com/econoboxgarage
Steve-in-Florida thanked Spritey for this post

59undine
Dean Hedin
Hatboro, PA, USA
Sign in to contact
1959 Austin-Healey Bugeye Sprite "Undine"
1972 Triumph GT6 MkIII "Et Tu Bruce" 1988 Merkur Scorpio "Late 80's Luxury" |
Aug 24, 2023 01:51 PM
Top Contributor
Joined 5 years ago
1,253 Posts
|
The whole reason these things become stuck/worn is because nobody ever greased them. Quite possible that YOU are one of the nobodies that never greased them.
So, when you are all done....grease it regularly.
Also, there was an Arcadian gentlemen (whose name now escapes me) that gave a real nice presentation on the Fulcrum pin R&R at one of the five year Sprite gatherings.
One "upgrade" that he performed was to install a grease zirt on the opposite side of the a-frame...which I think is a great idea, because grease does not make it over to the far side in the original configuration. He just drilled and threaded the zirt though item 15 in the diagram above.
I don't know if the king pin kits still come with cork washers that go on either side of the king pin on the fulcrum to keep the gremlins out.
If they are cork, don't used them. They fall apart. Find a grease resistant rubber washer to substitute. These are 21,22 in the diagram above.
I have to look around and see if I can find his handout. Not sure I still have it. But if I do I'll scan it & post.
Specialization is for insects.
Edited 4 time(s). Last edit at 2023-08-24 02:26 PM by 59undine.
|
Aug 24, 2023 04:10 PM
Top Contributor
Joined 14 years ago
4,822 Posts
|
|

|
|
Topic Creator (OP)
Aug 25, 2023 08:35 AM
Top Contributor
Joined 4 years ago
357 Posts
|
|
Aug 25, 2023 09:17 AM
Top Contributor
Joined 14 years ago
4,822 Posts
|
|
What you see is what it is.  The threaded fulcrum pin is gone, replaced with a bolt and real bearings on each end instead of relying on threads as a bearing. The location of the bolt is set with shims to determine camber angle. It was developed by Clancy Schmidt. The Bugyeyeguy sells them (as well as others) and has a good description on their website.
https://bugeyeguyparts.com/products/adjustable-control-arm-a-arm-sold-individually
Much cheaper if you buy them directly from Clancy. 785-318-0485 clancy@sunflower.com
The threaded fulcrum pin is gone, replaced with a bolt and real bearings on each end instead of relying on threads as a bearing. The location of the bolt is set with shims to determine camber angle. It was developed by Clancy Schmidt. The Bugyeyeguy sells them (as well as others) and has a good description on their website.
https://bugeyeguyparts.com/products/adjustable-control-arm-a-arm-sold-individually
Much cheaper if you buy them directly from Clancy. 785-318-0485 clancy@sunflower.com
In reply to # 280140 by dmq400
Rick- Not sure what I see there. Looks like a modified end on the A arm with shims behind it for camber adjustment?....or? Something you came up with?
|
|
Topic Creator (OP)
Aug 25, 2023 09:45 AM
Top Contributor
Joined 4 years ago
357 Posts
|
Rick - Was not aware of that modified A arm....looks like a good idea, after seeing the BEGuy vid. Can you buy just the bolt on end and modify the A arm to fit it yourself? So I am still mystified about camber in general. I believe you take your BE to the races and can understand the need for adjusting camber for the track. I do have a 2nd BE that does have "corrected" damage (not very well) to the front end resulting in a lot of positive camber on the drivers side. Thing is... it seems to drive very well. Stays straight on the road with no wobble. Now I never go over 70 mph on these 50 mph speed limit roads and maybe thats why I don't notice it? Granted the tire wear will be apparent eventually...but NBD doing maybe 1000 miles a season.
Having trouble posting or changing forum settings?
Read the Forum Help (FAQ) or click Contact Support at the bottom of the page.