
The Sprite Forum
Steering Rack bracket help
Posted by Tim66


Tim66
Tim Burchfield
|
Topic Creator (OP)
Jul 30, 2020 11:03 AM
Joined 16 years ago
319 Posts
|
1960 Sprite MK l
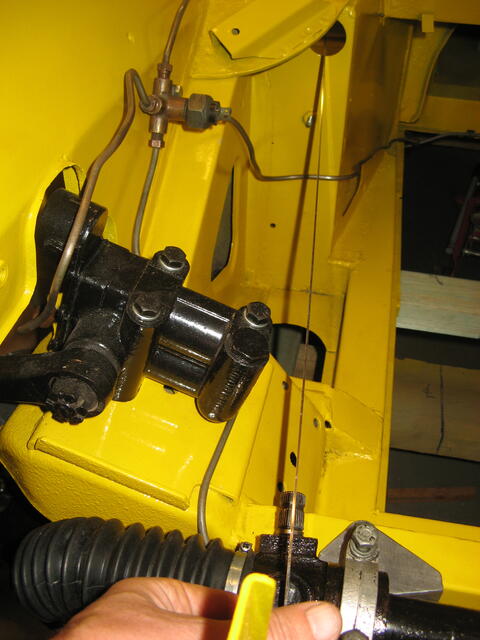
I removed the steering rack brackets to paint them. There was a 7/32" plate behind one bracket located on the vertical side (#44 in the diagram). The parts book list the bracket as Packing - mounting bracket - rack. and states that 2 are required. They range in size 1/32 3/32 5/32 7/32. My question is, does anyone know of a procedure to determine what bracket packing goes where to achieve the proper adjustment/alignment? I know these had been removed because there was the PO paint under the bracket. I don't know if he lost the other packing or it was never there.
Tim
1951 MG TD TD12524
1953 MG TD TD26711
2018 Honda Clarity
1960 Bug Eye Sprite
2021 Toyota Tacoma
Attachments:
Bugeye steering bracket.jpg 22.2 KB

|
Jul 30, 2020 11:31 AM
Top Contributor
Joined 14 years ago
4,822 Posts
|
|
Hi Tim,
The catalogs and even the factory parts book are incorrect. Only one plate is needed and on every car I've ever seen it goes on the side opposite the steering column. It's needed to correct a slight misalignment between the rack and the hole the design engineers put in the dash for the column. The steering system will bind a little without the plate.
Rick
In reply to # 227921 by Tim66
1960 Sprite MK l
I removed the steering rack brackets to paint them. There was a 7/32" plate behind one bracket located on the vertical side (#44 in the diagram). The parts book list the bracket as Packing - mounting bracket - rack. and states that 2 are required. They range in size 1/32 3/32 5/32 7/32. My question is, does anyone know of a procedure to determine what bracket packing goes where to achieve the proper adjustment/alignment? I know these had been removed because there was the PO paint under the bracket. I don't know if he lost the other packing or it was never there.
Tim
Tim66 thanked refisk for this post
|
westburn70
Eric Flack
|
Jul 30, 2020 01:47 PM
Joined 9 years ago
772 Posts
|
Take great care on tightening bracket No 40. Its aluminium. Torque load is about 6 to 8lbs! I have only ever seen one plate on opposite side of steering column. No 45 is a paper type gasket. Although you could probably cut it from wax type paper. These steering racks were "upside down" Morris Minor (out of the BMC parts bin). The aluminium brackets were not painted. The rest was painted black.
 Apollo Beach, FL, USA
Sign in to contact
|
Jul 30, 2020 02:46 PM
Joined 15 years ago
2,650 Posts
|
Tim,
Clean out the bottom of the rack with a tap, lots of swarf down there. Bolts are a special length as normally that bottom hole is closed and they will bottom out and won't get tight enough. I made that mistake once and found the rack wandering around when I turned the wheel. I used a piece of bicycle inner tube glued to the top of rack brackets on one side to help secure things.
Regarding the rack mounts. Again they are aluminum and they will break if over tightened beyond 6-8 ft pound. I know as I broke one when reassembling Bugsy's Rack,.I gave out a very Loud Oh S__! as those brackets are NLA. Fortunately appealing to this list brought me a replacement bracket from someone's Spare Parts stash.Again normally unpainted.
Rack is normally filled with 90 Wt Gear Oil. Either obtain a Zerk Fitting that can go on your Grease Gun and dump some 90W in the rack, or I got a pump type oiler, removed the Zero Fitting, and pumped 90W into the Zerk Fitting Hole. When I installed Bugsy's Rack either something I did wrong in reassembly or through some misalignment, rack started leaking at the Pinion Gear. I think a good portion of the 90W has already ended up on my garage floor over the past few months, My solution, that has been used by others on this list, is a product available at local Tractor Supply, Rural King, or local John Deere Dealer called Corn Head Grease.Comes in a Grease Gun tube. It's a thin grease that works well with our rack and pinion but is not viscous enough to simply leak out. If you can't find locally Amazon will bring you a tube in a few days.
Use a new Metal Locknut not a Nylock for the Steering Rack to Steering Column Bolt. I believe this is a Hardened Bolt. I did go ahead and use an 8 point bolt in this application along with nw lockwasher, metal locknut, and a dab of Lock Tite Blue. If horn push does not work after you put it all together it will be a grounding issue.. New paint is not allowing Column to ground itself. You'll need to add a ground wire to the steering shaft mounting bolts
With all 3 of these responses from myself and other experts. you can get it done, Not Break Something, and have the horn work when you are done.
Jim Gruber - Apollo Beach, FL
Bugsy IV - '60 Bugeye - 1,275+.040 and a 5-Speed - CA Car - 2nd Owner from new - Driving It Like I Stole It!
A truly rust free, garaged in Los Angeles for 57 years Bugeye
Mr. MAX - '04 Miata MAZDASPEED w Factory Turbo - Zoom Zoom Fun and Fast!
|
Tim66
Tim Burchfield
|
Topic Creator (OP)
Jul 30, 2020 04:56 PM
Joined 16 years ago
319 Posts
|
|
66Sprite
David R
|
Jul 30, 2020 05:11 PM
Top Contributor
Joined 8 years ago
467 Posts
|
Tim66 thanked 66Sprite for this post
|
S1 Elan
Kurt. Appley
|
Jul 31, 2020 07:45 AM
Top Contributor
Joined 13 years ago
2,760 Posts
|
Davids approach makes sense. I've had trouble getting the steering to not bind on two cars that might have been tweeked a bit from collision. I just left the rack loose for a test of what it should have felt like and then began re-tightening with various temporary shim packs till I got it close enough. Another method would be to leave everything loose where the steering shaft goes through the dash. Stands to reason that if everything isn't aligned perfectly you will have heavy steering.
Kurt
Kurt
about 5 years and 6 months later...
 |
Feb 21, 2026 12:50 PM
Joined 10 months ago
82 Posts
|
In reply to # 227930 by Jim Gruber
Tim,
Clean out the bottom of the rack with a tap, lots of swarf down there. Bolts are a special length as normally that bottom hole is closed and they will bottom out and won't get tight enough. I made that mistake once and found the rack wandering around when I turned the wheel. I used a piece of bicycle inner tube glued to the top of rack brackets on one side to help secure things.
Regarding the rack mounts. Again they are aluminum and they will break if over tightened beyond 6-8 ft pound. I know as I broke one when reassembling Bugsy's Rack,.I gave out a very Loud Oh S__! as those brackets are NLA. Fortunately appealing to this list brought me a replacement bracket from someone's Spare Parts stash.Again normally unpainted.
Rack is normally filled with 90 Wt Gear Oil. Either obtain a Zerk Fitting that can go on your Grease Gun and dump some 90W in the rack, or I got a pump type oiler, removed the Zero Fitting, and pumped 90W into the Zerk Fitting Hole. When I installed Bugsy's Rack either something I did wrong in reassembly or through some misalignment, rack started leaking at the Pinion Gear. I think a good portion of the 90W has already ended up on my garage floor over the past few months, My solution, that has been used by others on this list, is a product available at local Tractor Supply, Rural King, or local John Deere Dealer called Corn Head Grease.Comes in a Grease Gun tube. It's a thin grease that works well with our rack and pinion but is not viscous enough to simply leak out. If you can't find locally Amazon will bring you a tube in a few days.
Use a new Metal Locknut not a Nylock for the Steering Rack to Steering Column Bolt. I believe this is a Hardened Bolt. I did go ahead and use an 8 point bolt in this application along with nw lockwasher, metal locknut, and a dab of Lock Tite Blue. If horn push does not work after you put it all together it will be a grounding issue.. New paint is not allowing Column to ground itself. You'll need to add a ground wire to the steering shaft mounting bolts
With all 3 of these responses from myself and other experts. you can get it done, Not Break Something, and have the horn work when you are done.
What is the measurement for bolt #46?
Thanks

froghealey
Peter Dulieu
Hornchurch, Essex, UK
Sign in to contact
|
Feb 22, 2026 02:25 PM
Top Contributor
Joined 5 years ago
1,474 Posts
|
|
earthur44
Eric Miller
|
Feb 23, 2026 12:39 PM
Joined 12 years ago
894 Posts
|
Bugeye Guy sells a set of them if you want to getter done. The best way to not make mistakes or guess wrong is to carefully remove the firewall bracket when removing the column and immediately replace the packing, plate and bolts exactly as you found them.
Edited 4 time(s). Last edit at 2026-02-23 09:51 PM by earthur44.
Edited 4 time(s). Last edit at 2026-02-23 09:51 PM by earthur44.
Having trouble posting or changing forum settings?
Read the Forum Help (FAQ) or click Contact Support at the bottom of the page.
